|
|
Adding Color to Pen Drawings in Photoshop...
(No image)
When drawing an image to be scanned and colored, keep in mind that they MUST be in ink, and when you scan them they should be scanned in line art. Sometimes it's helpful to retraceyour image on tracing paper for a mor clear scan and deduction of mistakes.
This is a sample of something that I actually drew in photoshop but it still should be pretty easy to understand.
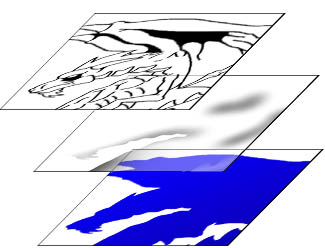
The next thing to do after you have completely scanned the image is to open the Image menu and go to the Mode submenu. Go to RGB color. Next, go to the the Select menu and go to the Color range option. Of course, your image schould still be black and white, so So select the Shadows of the image. Now copy whatever has been selected and delete your image. Paste it as a new layer, the point of this was to make it so your able to color underneath the original pen lines. Now the next thing to do is to color underneath your black and white layer. Make a new layer and name it something like base colors or whatever. You should never color anything in the background layer. do not shade just yet, only add the basic colors. My dragon is complely blue so i quicly colored him blue. USE THE LASSO for color, itmakes it much easier and shaper
(NOTE: the little white outlines in my image would not be there if i had scanned this from an ink sketch. I used photoshop completly for this pic)
Now were going to add a new layer, but before you do command/control click on the base color layer. You should see that only the areas with color are selected. Without deselecting make a new layer. This will prevent you from airbrushing out of the lines. This layer goes above the base color layer.

Now you can add little things in like a flaring eyes or motion blurs or whatever.